- The Blueprint Show
- Season 1
- Episode 35
How ‘Wicked: For Good’ Rebuilt Oz, from Yellow Brick Road to Dorothy’s House
Released on 11/26/2025
It's an old Hollywood trick.
We hand paint all the backings with scenic painters,
much as they did in the past in the '39 film,
The Wizard of Oz.
So if you look here, everything this side is real set,
everything this side is painted backing.
So we very much looked at the golden age of Hollywood
in the '30s and really took cues from that era.
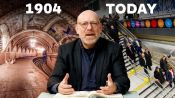
Hi, I'm Nathan Crowley, the Production Designer
for Wicked for Good, and I'm here today
to talk to you about the building of Oz.
[upbeat music]
Here we have the map of Oz.
So in the first film, we mainly center on Shiz University,
which sits up in Gilligan country, quite north.
And we travel between here and the Emerald City.
And then we also travel between the Munchkin Village
and the Emerald City.
And the only other place we sort of feature
is Elphaba singing The Wizard and I
and looking over the impassable desert.
And the journey that leads us during film two
exists from the Emerald City
when she leaves in Defying Gravity
through the forest, the great forests of Oz,
where she builds her really temporary sanctuary,
a hiding place, and eventually ends up at Kiamo Ko,
which is an ancient seat of Oz,
once owned by Fiyero's family.
And now in Kiamo Ko, we understand the creation
of the Wicked Witch of the West.
Glinda's journey south Emerald City
eventually becomes her journey
into being the Good Witch of the North
and we start identifying those main characters.
Nessarose becomes a Wicked Witch of the East.
We get to understand the creation of the Tin Man,
the creation of the Lion, the creation of the Scarecrow,
and eventually they come together for good.
The other defining connective tissue in this film
is the Yellow Brick Road.
The story demands that we now start to see
what that Yellow Brick Road signifies to the story.
Here we have Elphaba trying to free the animals
that are enslaved to build this yellow brick road.
So what we're actually seeing here is,
this is on location, this is all real road,
and this is CGI trees,
but we've photographed them at the studio
'cause we made them for the forest,
so the VFX have the information they need.
And Elphaba's actually on wires here,
and we are landing her with big cranes onto the road.
You'll see piles of bricks in the background here.
These come from Munchkin land,
and Munchkins are tasked with only using
and planting yellow tulips,
which provides the colors for the bricks.
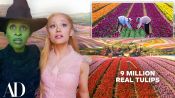
Mark Eves, our farmer who grew all the nine million tulips,
he also planted a million yellow tulips.
And we need to see these tulips being cut down,
the yellow dye used, taken to Munchkin land
and made into bricks.
Behind this camera, a few fields away,
all the colorful tulips we grew for film one.
Farmer who grew all those nine million tulips,
we actually get to see them in the second film.
And at the end of this sequence,
you'll see one of the guards run across
our 9 million tulips from the first film, high shot
into the Munchkin village.
Really in film one, all the colored tulips
were this joy and delight,
and really showed the colorfulness of Oz
and the freedom and the lifestyle of the Munchkins.
These yellow tulips represent quite the opposite,
oppression, the turning of Oz
into a place that the wizard is controlling.
So these are not good.
Here we have the Yellow Brick Road pushing west
through the forest, and these are made out of plasters,
and then we have to paint it yellow,
and that's where it actually gets a bit tricky
because yellow under different lighting
becomes very difficult so once we found the yellow we like,
we then use a series of different glazes.
So under different lighting conditions,
it will fill the same color and this was a set build
on quite a large stage in Sky Studios north of London
and you can start to see the fact that we weave it
and it goes down here and up here to create
these sort of undulating hills.
So you may wonder why it's always winding and undulating,
especially in the 39 film.
It's really taken on how they did the first film.
Because they went straight into backings
and you have to create a transfer gap
between real set and backing.
So you have to feel like there's another gentle rolling hill
before you hit the backings.
So this is an old trick from the original film
where you literally go down and you come back up
and you create a little hump.
So you feel like it goes down here
and back up into the backing.
We put a canvas up around the entire stage,
as high as the 35 feet,
and we hand paint the backing with scenic painters.
And then we light that.
Oddly, if it's photographically sharp,
it looks flat and fake.
Whereas a painter,
the fact that you get a slight diffusion through paint
that allows the human imagination to push that backing away.
Okay, so here we have a stage plan,
which is a top view looking down the forest
and the yellow brick road.
So here is the yellow brick road with undulating ramping
and it finishes here.
So we're at high points here we're probably
at plus six plus six and we go down
to plus one in the center and then probably plus two there
so you can really feel the undulation.
Around this whole stage this is the painted backing,
the whole lot.
Now, we can't really paint this until we understand
all the placements of the trees
so we can start to understand what views we need
and how the perspective works into the backing.
So the perspective on this side is not hard
because we know the yellow brick road is going to wind in
and it's surrounded by trees.
So we know kind of these two sides,
it's these two sides in terms of a painted backing
that we really have to be careful with
because we don't want a big tree too close
to the backing and if we have a big tree there,
we're going to need to put perspectives
of trees getting smaller at the right scale
into that backing.
So it's very important that it happens as one journey
for the scenics, for the set construction,
for the greens department.
And we paint it for night,
and then if there's areas we need,
we can paint it for day two.
Okay, so the other place the Yellow Brick Road
exists is in Munchkin Land in the village.
So here we have the collision of the Wizard of Oz
and Wicked.
We're looking at the Yellow Brick Road as it comes in,
and it curls.
This spiral is the actual collision of the two stories.
So this is the story of Dorothy
on her journey to the Emerald City.
And it's a journey that's really been created by the wizard.
She's now being used by the wizard
as a witch hunter to chase Elphaba.
We have the tornado that drops the house
on the Wicked Witch of the East.
We have Nessarose's journey down towards that tragic moment.
This is also the moment
where Glinda and Elphaba confront each other.
There's a very intense emotional moment.
We have a lot of story ideas colliding
and that needs a lot of visual ideas.
So here we have the crashed house.
That's the start of Dorothy's story
and it's the start of The Wizard of Oz
clashing with Wicked.
So how do we do a crashed house in Munchkin Land?
We've also doing a lot of filming here without the house.
Practically, we need to create this house somewhere else
and we need to design it, make it, fabricate it
so we can move it into place.
So this image shows us constructing the crashed house
outside the set.
We actually built it about 300 feet behind the set
and we sculpted it and built it
and then figured out how to move it
and crane it into position for these shots
and then take it out for the filming that happened after it.
These are all prop warehouses.
Actually, we're growing tulips in this one.
And so behind here is the actual set.
So this looks like a house from the outside,
but inside it's just a series of bracing and structure.
So we can pick it up and crane it onto set
as a sort of overnight changeover.
So the inside is just a series of cross bracing,
except where we'd have to put window dressing
and actually some pieces of furniture or wall hangings
for any view we might see through a window.
So you'll notice how these windows are notoriously small.
And that really is to constrict the view
because we've got to lift this thing onto set.
So we have to make sure that the structure is safe.
This is the most famous house in a fairy tale.
It's most certainly an American fairy tale.
So it really has to be a slice of Americana.
There's a painter called Andrew Wyeth
who described a lot of this type of farmhouse
in his paintings.
So we really have to connect with the feeling
that those paintings give you
alongside something you're very familiar with.
We spent a lot of time looking at this house
and deciding how this collapsed, how roof tiles collapsed,
how wall might collapse, how window might collapse,
remembering we have to leave an area
for the shoes to exist,
which is actually one of the most important pieces
of this design.
One of the most important sets
in the second film is Kiamo Ko.
It's actually where we hinted it in the first film
in the opening shot,
but it really exists in the second film as a new set,
it's a very important place.
It's really what we know as the castle
of the Wicked Witch of the West.
This is as far west as Oz goes.
This is being held onto the land of Oz
by a very small bridge,
and it's pushing west into the impassable desert.
And this is a reminder of where our story ends.
There's two sets I needed.
I needed this area for No Good Deed.
So I needed this arch area here to play a whole scene.
And then I needed the battlements at the top For Good.
For Good being a very emotional song,
and the connection of these two friends.
Could I then design it in a way
that it felt like it belonged to Elphaba
when she finally becomes a Wicked Witch of the West?
And here I saw the opportunity to start bringing in
the time that belongs to the Grimmerie.
Could I make a castle that felt like
the top half was floating?
So how do we make a floating castle?
So some time ago I thought,
Well, if you have arches that sit on the ground,
you know, wouldn't that be great?
But what if they didn't sit on the ground and they floated?
So the magic in a floating arch, which is great,
but that would mean there's really a very small gap
between the arch and the floor.
But what if the castle had a mirrored arch in it?
So then suddenly you get these arches
that feel like they are floating.
So from a distance, we start to see views and light
through all these arches, but they don't connect.
So the whole top half of the castle here
feels like it is floating.
Here we have the No Good Deeds set,
and you'll notice here's the floating columns,
here's the gap, here's the arches which connect
to allow the castle to float,
if this is the upper bit of the castle.
This place is also a network of stairs,
trap doors for the monkey, hidden passages.
These trap doors and these staircases
play a very important part in the final scenes of film two,
a Wicked For Good, and you'll find out why.
This was the planned idea of what we might build
on a soundstage.
Here's the problem.
We would need to hang this entire top half of the set
'cause it doesn't connect to the bottom half from the grid,
and then we'd need to put this lower half on the floor
with its upside down arches,
which ultimately wouldn't allow the camera
to make the moves it needed within the set.
And so there was a lot of complexity in here.
We knew that we could only build the moments
where Elphaba needed to travel for a No Good Deed.
And so within this set, we just picked certain parts of it
and built those bits only on a soundstage,
still leaving the correct distances.
So it was a strange set.
It looked kind of half built.
So Visual Effects could take this 3D model
and then recreate the bits in between
and they wouldn't get in the way of the camera
and also allow us to put in the flying monkeys
where we needed and the rest of the castle.
Kiamo Ko also houses the battlements,
which is the top portion of the floating section
of the castle.
And that's where we stage For Good,
one of the main songs of the second film.
Came up with this design of the battlements
that really was in keeping with passageways,
spacious staircases and rooftops.
So we have walkways, caps, all leading the large turret,
which is where we house the scene
where Dorothy melts the Wicked Witch of the West.
And all of this is pushing West.
So the Impassable Desert's down here.
So it really feels like it's a wave of architecture
at the front of Kiamo Ko.
This is the set we constructed at the play, For Good.
When we sing For Good,
they are looking out West into the Impassable Desert,
knowing the journey that is coming.
And we've got these flying buttresses,
which give us shape and form.
We sculpted these two fallen angels,
which really play into the story of these two great friends.
So then there's key story points here,
which is the buckets and the water pump
for the witch hunters when they arrive.
Rather than just the stone castle we see a lot,
I ended up putting in these glazed brick steps
that work all the way through this castle,
just to really push the blue
or maybe make it a bit more Ozian.
Here's the only bit we saw in the first film
with the flying monkeys crashing out through the window.
And that's how we opened the first film.
But the entire film concludes here
in the Wicked Witches of West chamber.
But the reason there's a big window here
is this faces the impassable desert.
You'll see the stepping brick, the glazed blue brick
that collides with the floor.
These stepping glazed brick pilasters
are sort of inspired in a sort of modern art deco
kind of form with the stepping down.
Behind the tapestries are hidden doors,
and that's important for when Glinda witnesses the events
that happen in this room.
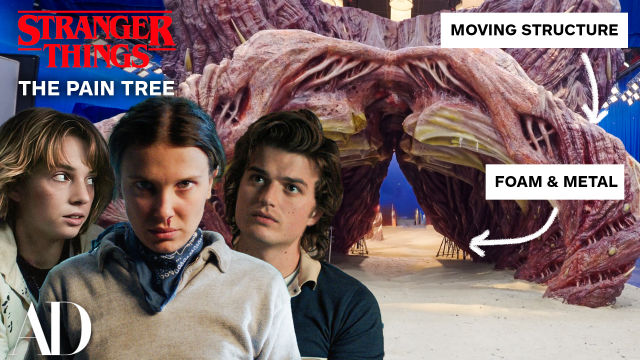
Let's talk about where Elphaba goes
directly after the first film.
She leaves the Emerald City
and she heads towards the forest.
And this is where she makes a hiding place.
And the idea here was to build a hiding place
in what I consider the mother tree of the forest.
So what does that look like in terms of design?
So now we need to build this set on a soundstage.
Talking to the greens department,
they felt that if we gave them a rough structure,
they could actually weave this out of found branches
and materials from the forest.
We were sort of excited
to sculpt out of natural materials a whole set.
So we knew we were gonna weave this
with our greens department,
and we knew that the steel department
had to provide some kind of framework
because the other thing that really enhances this design
is we know Ozian trees are circular
and they curve upwards and the branch weaves together.
So how do we do it?
You can see the structure.
You can see some of the tubes, the steel tube here.
And here you see our greens department, or one person.
Here you see our greens department with their materials.
And then they slowly start to weave this into a nest.
We had the construction riggers
give them structure as they went.
We started with the entrance door here
and we weaved as many branches as we could.
and we needed to flow them around this area.
And once we got that structure
and then we could turn those branches
into windows and openings,
we could then find a way to go down into the bedroom
and out onto the balcony.
So this was very much a sculptural job.
It was a piece of art.
It's probably about 30, 40 feet in circumference.
Our size of our greens department was quite large.
It had at least 40 people.
That's because we were doing landscapes,
we were doing Munchkin Land,
we were dealing with the flowers and the thatching.
We had about three or four people
from the greens department working on this
and really it needed to be less
because it was a weaving job.
We needed particular people who would slowly look at this
and make it, it couldn't be hit en masse.
Here's the finished set
and looking from the doorway out to the balcony here.
And you can see everything is natural
from the greens department, apart from this tree,
which is sculpted by our construction department.
And you can see it splays out
to allow us to create this roof of branches.
So how do we get light into here?
Well, we can't leave it open
because you'll see the stage ceiling.
So we don't want to put blue screen up here.
So then the plaster said, we think we out of resin,
we can make these giant leaves out of translucent material.
And if we layered those up, it would look like the canopy
of a forest in translucent materials.
And so we laid those on top of this canopy
and that allowed us to hide any lights.
And then the lighting department would take away the leaves
where they were pushing light through.
And so you can see the windows.
These are woven branches.
Here's a woven window from the outside.
So you can see how they wove these windows.
So if we needed to get a shot from the outside in,
we could then frame that area.
You can see some sort of dense wicker fencing here.
This was used to kill any light leaks from the outside.
So the greens department foraged
for a very particular type of branch
that had some flexibility
and then we could actually weave with.
We kind of designed this as we went,
with the help of all our department
because it was a piece of sculpture.
So while Elphaba is heading west to Kiamo Ko,
we find Glinda in the Emerald City.
And now we get to describe
the three towers of the Emerald City.
So we have the Wizard's Tower,
where Elphaba in Defying Gravity departed from.
We have Madame Morrible's Tower,
where the propaganda room is in film two,
and that's her domain.
And then we now have Glinda's tower,
which is slightly more elegant.
And now we get to describe all these new places
in the Emerald City that exist higher up.
And you can start to see a transition
from more solid materials,
which exist on our backlog set,
up into the light, more translucent materials
that form the three towers of Emerald City.
One of the reasons we do this kind of conceptual drawing
and three-dimensional drawing in the art department,
We need to design every inch of Oz
and every piece of architecture, every landscape.
So in post-production visual effects
know what everything looks like.
And they know that from our 3D model,
if you're at Glinda's looking out here,
you're looking across at this view here.
So it's very important during production
that the art department not only build the sets down here
with construction and set deck, even though it's digital,
we have to keep designing the whole of the Emerald City.
So we know exactly what each view is,
and it all starts to make sense.
So in Glinda's tower, we have Glinda's apartment.
So in film two, in Elphaba's journey out of the Emerald City
was her realization that she has to become
the villain that Oz needs, not the hero they deserve.
And she has to become the Wicked Witch of the West.
Glinda's journey centers on the Emerald City,
and she has to give up privilege
to become the Good Witch of the North.
And we needed to create an interior that suited Glinda,
but still kind of clung onto the Emerald City.
So we very much looked at the golden age of Hollywood
in the 30s and really took cues from that era.
One of the reasons I liked that idea
was because the designer, Cedric Gibbons,
of the original Wizard of Oz,
his favorite architecture was art deco.
So I really felt that it belonged to Glinda,
belonged to the Wizard of Oz, belonged to Wicked,
and we could now introduce it to Glinda.
We'd have to change a few things.
We'd have to put luscious silk fabric panels everywhere.
We had to soften it
with this wonderful sunken seating area.
The reason why we employed symmetry
for the girl in the bubble,
because a girl in the bubble is the moment
after Glinda sees the witch hunters leave
to go and kill her best friend.
She doesn't like her reflection anymore.
This is a turning point for Glinda.
So that number has to divide itself
into reflection and the real Glinda
and leave the reflection behind
as who she was and who she has become.
Reflective Glinda, real Glinda,
the new Glinda, the old Glinda.
How do we do that in a song?
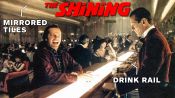
Jon Chu and Alice Brooks, the cinematographer,
wanted to push from reflection to real Glinda,
which means crossing a mirror line in a set.
It's an old Hollywood trick.
It's an old illusionist trick.
So how do we do that?
First of all, the set has to be symmetrical.
This half of the set here has to match that half.
So when she comes in from the witch hunters,
she comes in through these double doors
and she heads towards a mirror.
The camera's here and we see her in the reflection
onto the reflected side of the room.
So I know that sounds complicated,
but the easiest way to explain it
is if we were building two sets,
it would be a lot simpler.
This is this reflected here.
So it'd be very easy here to come around
with Glinda looking at each other,
but we're not able to build mirror sets and light them.
We only can build one set, light one set.
So we have to shoot the whole scene on this set.
And now we do the whole reflected set from this.
We just cut up here.
So now we're opening this wall
and the camera comes around here
and pushes away with reflected Glinda.
So we're now in the reflection side of Glinda
and she moves across here.
And there's about five of these sort of crossovers
between reflections and real Glinda.
We come here and we push up to a mirror in the ceiling
and that reflection is actually a camera move down.
And so now we're back into real Glinda.
Then we follow up the stairs
and we eventually come to this corridor
and this corridor, the reflection of that corridor is this.
So that's the mirror version of that side of the set.
So now we're back in reflected Glinda and we're here
and we're gonna go down the stairs.
So what does that mean in terms of the real set?
What it means is we are going down this staircase,
which is that one over to the north side.
As we come down and reflected Glinda moves here,
our camera pushes into this reflection,
which means that we're back with real Glinda
and then we hinge this wall back and our camera is here.
We've lost reflected Glinda
and we push with real Glinda to the center door,
then out to the bubble.
Here's the bubble, and this is where she looks
at her distorted reflection in the bubble,
knowing that she is now changed,
and the old Glinda doesn't exist anymore.
The second film, for myself and my art department,
really depending on us being able to build enough,
to design enough, to explain enough,
so the audience could feel like they were touching it.
And we really had to continue that into the landscape,
unlike the first film.
That was very important to me and my team
that we touched Oz and we touched the '39 film
and we embraced a little art deco,
a little bit of art moderne,
and a little bit of something new.
And we gave a nostalgia that belongs to this story.
Architect Breaks Down 5 Typical New York Apartments
Architect Breaks Down Details of “The Grand Budapest Hotel"
Architect Breaks Down “Bridgerton” Mansions
Architect Breaks Down 6 Luxury Apartments from Billions, Gossip Girl & More
Hidden Design Details in Mad Men, That ’70s Show & More

Architectural Expert Breaks Down Disney Castle Details
Architect Breaks Down Baseball Stadium Details (Past & Present)

Expert Breaks Down Hogwarts Architectural Details
Architect Breaks Down the Evolution Of Batman’s Wayne Manor
Architect Breaks Down 5 Haunted Houses From Scary Films

Expert Breaks Down Wakanda's Architecture In 'Black Panther'
Why The Chrysler Building is a New York City Icon
Architect Breaks Down NYC Subway Stations (Oldest & Newest)
Expert Compares Star Wars Locations To Their Real-Life Inspiration

Architect Breaks Down Movie Theater Evolution, From Palaces to Multiplexes
Architect Breaks Down 5 of the Most Common Skyscraper Styles In New York
Architect Breaks Down 3 Demolished New York Landmarks
Architect Breaks Down the Designs Of 5 Iconic Movie Bars
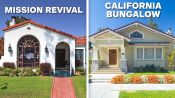
Architect Breaks Down 5 of the Most Common Houses in L.A.
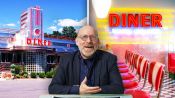
Architect Breaks Down Why All American Diners Look Like That
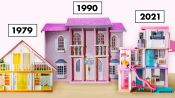
Barbie Historian Breaks Down The Dreamhouse Evolution (1962-Now)
Why New York City Wouldn’t Exist Without These 5 Bridges
How Iconic Disney Castle Interiors Were Inspired By The Real-World
Architect Breaks Down Why Movie Villains Live In Ultra-Modern Houses
Why 4 New York Museums Were Designed So Differently

How 'Dune' Replicated Real-Life Ancient Architecture

Architect Breaks Down the Most Common Styles of College Campus
The Secret to Good Airport Design: Aesthetic vs Efficiency

Francis Ford Coppola Breaks Down The Design of ‘Megalopolis’
How ‘Wicked’ Built Immersive Real-Life Sets, From Shiz To Emerald City
Why Prefab Architecture Could Be the Future – But Probably Won’t Be

How Zaha Hadid Revolutionized The Way Architects Design

How Frank Lloyd Wright’s Architecture Evolved Over 70 Years

How NYC Was Transformed into Gotham for The Penguin

How ‘Wicked: For Good’ Rebuilt Oz, from Yellow Brick Road to Dorothy’s House